오픈스택 수동 설치 실습 #.14

오픈스택 수동 설치 실습 #.14 – Cinder block storage 서비스 설치
Cinder – LVM을 이용한 스토리지 노드 구성

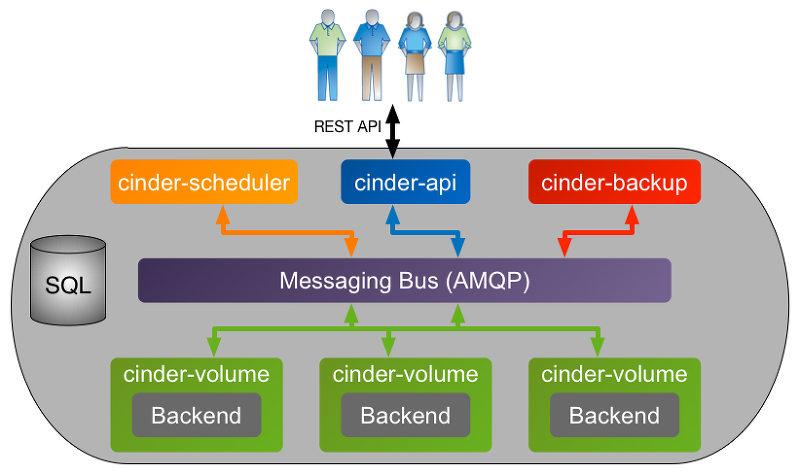
오픈스택 블록 스토리지(Cinder)는 오픈스택 컴퓨트 인스턴스에 사용할 지속적인 블록 레벨 스토리지 장치들을 제공합니다. 블록 스토리지 시스템은 블록 장치들을 서버에 작성, 부착, 제거하는 일을 관리하며, 블록 스토리지 볼륨들은 클라우드 사용자들이 자신만의 스토리지의 필요한 부분을 관리하기 위한 대시보드 및 오픈스택 컴퓨트와 완전히 연동됩니다. 로컬 리눅스 서버 스토리지뿐 아니라 Ceph, 클라우드바이트, Coraid, EMC(ScaleIO, VMAX, VNX and XtremIO), GlusterFS, 히타치 데이터 시스템, IBM 스토리지(IBM DS8000, Storwize 계열, SAN 볼륨 컨트롤러, XIV 스토리지 시스템, GPFS), 리눅스 LIO, 넷앱, 넥센타, 님블 스토리지, Scality, 솔리드파이어, HP (스토어버추얼, 3PAR 스토어서브 계열), 퓨어 스토리지를 포함한 스토리지 플랫폼들을 사용합니다. 블록 스토리지는 데이터베이스 스토리지, 확장 가능 파일 시스템과 같은 성능에 민감한 시나리오에 적절하며, 서버에 로우 블록 레벨 스토리지에 대한 접근을 제공합니다. 스냅샷 관리는 블록 스토리지 볼륨에 저장된 데이터를 백업하는 강력한 기능을 제공하며, 스냅샷들은 새로운 블록 스토리지 볼륨들을 만들기 위해 사용하거나 복원할 수 있습니다.
Controller 노드 설치
# su - postgres
$ psql
postgres=# create role cinder with login;
postgres=# create database cinder;
postgres=# grant ALL PRIVILEGES ON DATABASE cinder TO cinder;
postgres=# alter user cinder with encrypted password 'cinder';
키스톤 인증 불러오기
# . admin-openrc
cinder 유저 생성 및 admin 권한 추가
# openstack user create --domain default --password-prompt cinder
# openstack role add --project service --user cinder admin
cinderv2 와 cinderv3 서비스 생성
# openstack service create --name cinderv2 \
  --description "OpenStack Block Storage" volumev2

# openstack service create --name cinderv3 \
  --description "OpenStack Block Storage" volumev3
endpoint 생성
# openstack endpoint create --region RegionOne \
  volumev2 public http://controller:8776/v2/%\(project_id\)s

# openstack endpoint create --region RegionOne \
  volumev2 internal http://controller:8776/v2/%\(project_id\)s

# openstack endpoint create --region RegionOne \
  volumev2 admin http://controller:8776/v2/%\(project_id\)s

# openstack endpoint create --region RegionOne \
  volumev3 public http://controller:8776/v3/%\(project_id\)s

# openstack endpoint create --region RegionOne \
  volumev3 internal http://controller:8776/v3/%\(project_id\)s

# openstack endpoint create --region RegionOne \
  volumev3 admin http://controller:8776/v3/%\(project_id\)s
cinder 패키지 설치
# yum -y install openstack-cinder
cinder.conf 파일 수정
# vi /etc/cinder/cinder.conf

[database]
connection = postgresql://cinder:cinder@controller/cinder

[DEFAULT]
transport_url = rabbit://openstack:RABBIT_PASS@controller
auth_strategy = keystone
my_ip = 10.0.0.11
enable_v3_api = True

[keystone_authtoken]
auth_uri = http://controller:5000
auth_url = http://controller:5000
memcached_servers = controller:11211
auth_type = password
project_domain_id = default
user_domain_id = default
project_name = service
username = cinder
password = CINDER_PASS

[oslo_concurrency]
lock_path = /var/lib/cinder/tmp
블록 스토리지 데이터베이스 배포
# su -s /bin/sh -c "cinder-manage db sync" cinder
# vi /etc/nova/nova.conf

[cinder]
os_region_name = RegionOne
nova 서비스 재시작
# systemctl restart openstack-nova-api.service
# echo "export OS_VOLUME_API_VERSION=3" >> ~/admin-openrc
cinder 서비스 등록 및 시작
# systemctl enable openstack-cinder-api.service openstack-cinder-scheduler.service
# systemctl start openstack-cinder-api.service openstack-cinder-scheduler.service

storage 노드는 다양한 스토리지로 설치가 가능하지만 VM환경에서는 LVM으로 진행을 합니다.
필요 패키지 설치
# yum -y install centos-release-openstack-rocky
# yum -y upgrade
# yum -y install python-openstackclient
# yum -y install openstack-selinux
# yum -y install python-psycopg2
lvm 패키지 설치
# yum install lvm2 device-mapper-persistent-data
lvm 서비스 등록 및 시작
# systemctl enable lvm2-lvmetad.service
# systemctl start lvm2-lvmetad.service
pv 볼륨 설정
# pvcreate /dev/sdb
Physical volume "/dev/sdb" successfully created
vg 볼륨 설정
# vgcreate cinder-volumes /dev/sdb
Volume group "cinder-volumes" successfully created
lvm.conf 수정
# vi /etc/lvm/lvm.conf

devices {
...
filter = [ "a/sdb/", "r/.*/"]
# yum -y install openstack-cinder targetcli python-keystone python2-crypto
cinder.conf 파일 수정
# vi /etc/cinder/cinder.conf

[database]
connection = postgresql://cinder:cinder@controller/cinder

[DEFAULT]
transport_url = rabbit://openstack:RABBIT_PASS@controller
auth_strategy = keystone
my_ip = 10.0.0.41
enabled_backends = lvm
glance_api_servers = http://controller:9292
enable_v3_api = True

[keystone_authtoken]
auth_uri = http://controller:5000
auth_url = http://controller:5000
memcached_servers = controller:11211
auth_type = password
project_domain_id = default
user_domain_id = default
project_name = service
username = cinder
password = CINDER_PASS

[lvm]
volume_driver = cinder.volume.drivers.lvm.LVMVolumeDriver
volume_group = cinder-volumes
iscsi_protocol = iscsi
iscsi_helper = lioadm
target_ip_address = 10.0.0.41
volumes_dir = $state_path/volumes

[oslo_concurrency]
lock_path = /var/lib/cinder/tmp
※ [lvm] 부분은 없으니 만들어 줍니다.
cinder 서비스 등록 및 시작
# systemctl enable openstack-cinder-volume.service target.service
# systemctl start openstack-cinder-volume.service target.service
controller 노드에서 서비스 확인

볼륨 설정이 완료 되었습니다.
Cinder 까지 설치가 완료되어 코어 부분은 다 설치가 완료 되었습니다.

최신 댓글